


Every day we share a lot of personal information while shopping online, creating accounts, signing into different websites, etc.
If not properly encrypted, then this information can be spied and stolen.
This is where SSL comes in. It provides the encryption technology to secure the connection between a user’s browser and the web server.
This is extremely important especially when we run our own online store WooCommerce store.
What is an SSL certificate?
An SSL (Secure Sockets Layer) certificate validates your website’s identity and encrypts all information sent to and from your website. It ensures that all data passed between the web server and browsers remains private and integral.
At this point SSL was renamed TLS (Transport Layer Security), but it’s still widely referred to as SSL or TLS/SSL.
SSL certificates also contain important security information, including:
- Company name
- Company location
- Length of time the certificate is good for
- Details of the authority who issued the certificate
※ Let’s Encyrpt doesn’t include company name and its location.
How it’s linked to HTTPS and how to know if a website uses SSL/TLS
An SSL Certificate needs to be installed on your website to enable HTTPS browsing. Sites that have an SSL certificate installed display a green https and a green “lock” in their URL (instead of http).

It allows individuals who are uncertain about a website’s authenticity or trustworthiness to click the green “lock” icon in their browser to review more information. If they still do not feel secure, they are able to exit the site.
Benefits of having an SSL Certificate
- Trust – When people notice you use a encrypted connection, it’s more likely that they will want to register or purchase something from you especially if your websites handle sensitive user information like the ones who enable user registrations or offer paid membership plans.
- SEO – In August of 2014, Google announced that website security would be added as a “lightweight ranking signal” for results in its search engine. This meant that a website secured with SSL/TLS stood a better chance at ranking higher for a query than an unsecured one, assuming all other factors were the same.
- HTTP/2 – HTTP/2 requires HTTPS adding support for HTTP/2 on your site makes you page load faster gives it an instant performance boost. And if you already have HTTPS setup, enabling HTTP/2 is easy.
The consequences of not having a certificate
- Shoppers losing trust in you because your store appears unsecured
- A hacker using reverse engineering to hijack a customer’s email, social media, or other online account with information gained from your store
- Theft of sensitive personal or financial data stored on your server
- Potential financial consciences caused by any one of the above event
How to get a certificate
Paying for a certificate vs Free certificates from Let’s Encrypt
- Paid SSL certificate
SSL certificates can be purchased from a wide variety of third parties for example your domain reseller can offer an SSL option but before you buy considering the type of certificate you need.
Basic SSL certificates only cover one domain and they cost from 30$ to 50$ per year.
Multi-domain certificates or “wildcard” certificates to cover multiple subdomains but their cost can go up to 300$ per year.
- Let’s Encrypt
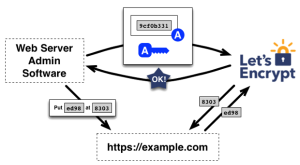
Let’s Encrypt is a free and open source certificates initiative from The Internet Security Research Group (ISRG) backed by Mozilla, Facebook, Automattic and some other big companies.
It’s still a beta, bugs are possible but it allows anyone to secure their site with SSL/TLS giving website and store owners a free, permanent SSL certificate.
How to install Let’s Encrypt on your server?
- Assign your domain (Route 53) and set and Elastic IP.
/2015/01/25/assigned-domain-route-53-setting-elastic-ip/ -
Launch the WordPress Powered AMIMOTO (HTTP/2) AMI
https://aws.amazon.com/marketplace/pp/B0178QFQBQ/
A step by step guide can be found below:
/support/how-to-use/amazonconsole/
IMPORTANT: Please follow the guide only till step 19 “Associate the address to your instance”
- Log into the root of your server using SSH
/2012/12/18/amimoto-ssh/
4. Update all packges:
$ sudo yum update
5. Install WordPress:
$ sudo /usr/local/bin/wp-setup example.com
- Check Python’s version:
$ python --version
Note: if your Python’s version is less than 2.6, run below command to switch default Python’s version 2.7:
$ sudo alternatives --set python /usr/bin/python2.7
7. Install Python:
$ sudo yum install python27-pip python27-virtualenv augeas-libs dialog gcc libffi-devel openssl-devel system-rpm-config
8. Install Let’s encrypt:
$ sudo virtualenv /opt/letsencrypt/
$ sudo /opt/letsencrypt/bin/pip install letsencrypt
9. Create a certificate:
$ sudo /opt/letsencrypt/bin/letsencrypt certonly -t -d example.com -a webroot --webroot-path=/var/www/vhosts/example.com/ --rsa-key-size 2048 --server https://acme-v01.api.letsencrypt.org/directory
10. Enter email address used for urgent notices and lost key recovery
11. Change nginx settings:
$ sudo cp /etc/nginx/conf.d/default-ssl.conf /etc/nginx/conf.d/example.com-ssl.conf
12. Edit gomp.pl-ssl.conf:
$ sudo vi /etc/nginx/conf.d/example.com-ssl.conf
server {
listen 443 ssl http2;
server_name example.com;
root /var/www/vhosts/example.com;
index index.html index.htm;
charset utf-8;

ssl_protocols TLSv1 TLSv1.1 TLSv1.2;
ssl_prefer_server_ciphers on;
ssl_ciphers AESGCM:HIGH:!aNULL:!MD5;
ssl_session_cache shared:SSL:10m;
ssl_session_timeout 5m;
ssl_certificate /etc/letsencrypt/live/example.com/fullchain.pem;
ssl_certificate_key /etc/letsencrypt/live/example.com/privkey.pem;

access_log /var/log/nginx/example.com.access.log main;
error_log /var/log/nginx/example.com.error.log;
13. Change nginx settings:
$ sudo cp /etc/nginx/conf.d/default.conf /etc/nginx/conf.d/example.conf
14. Edit gomp.pl.conf:
$ sudo vi /etc/nginx/conf.d/example.com.conf
server {
listen 80;
server_name example.com;
root /var/www/vhosts/example.com;
index index.html index.htm;
charset utf-8;

access_log /var/log/nginx/example.com.access.log main;
error_log /var/log/nginx/example.com.error.log;
15. Restart nginx:
$ sudo service nginx restart
16. Open a new tab in your browser and paste the address of your domain.
- Setup your WordPress by copying your instance ID.

Summary
I hope this introduction to WooCommerce and SSL certificates powered by Let’s Encrypt convince you to switch your online store to a more secure connections and take advantage of all the mentioned by me benefits.